Your source for quality wood siding and paneling in Metro Denver and Northern Colorado.
Front Range Lumber offers a range of solid wood siding and paneling products, in a selection of wood species, widths, thicknesses, and grades.
Your Front Range Lumber salesperson can help you choose the right siding product for your application, and your budget. Refer to the information below for helpful tips and recommendations when planning your project.
Wood Siding Selection.
Wood siding performance varies by grade, thickness, width, patter, and texture.
Although all wood siding products are considered “non-structural”, all siding products have been milled from lumber that has been graded by one of the industry recognized grading agencies.
After milling, siding products are generally categorized as either premium (clear) or knotty (STK). Such marketing terms aren’t the official “grades” of the material but they do describe the basic characteristics one can expect from their siding.
Premium grades (sometimes called “clear” or “select”) generally have little to no knots, pitch streaks, etc. Products with these characteristics are generally categorized as Knotty products (sometimes called STK or “common”).
It is important to keep in mind that there are no uniform standards for marketing terms such as Select, STK, NPS, etc. and these products can vary in quality from one source to another.
Select: Generally refers to boards that have been picked as “better” than average. In the industry, this is an attempt to get a better product “out of grade” – getting a better board from those already graded somewhat lower.
STK: Select tight knot refers to boards whose knots will remain solid and tight in the wood.
NPS: “No Previous Selection” means no boards have been pulled from the mill’s production of lower or better quality.
Shiplap Siding/Paneling.
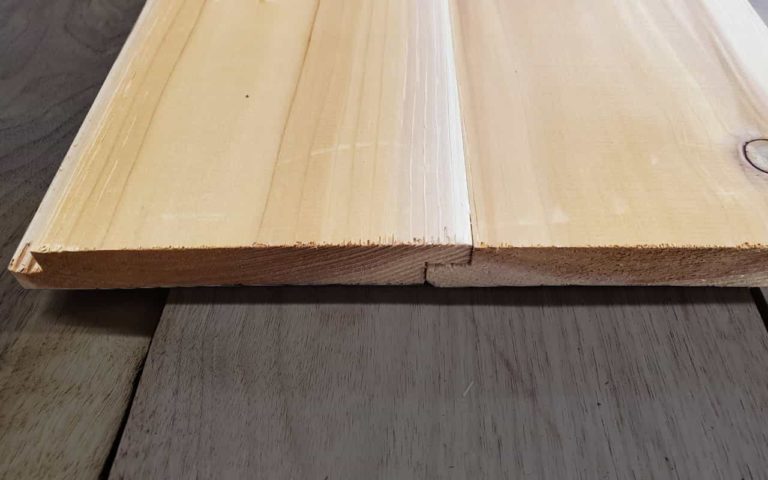
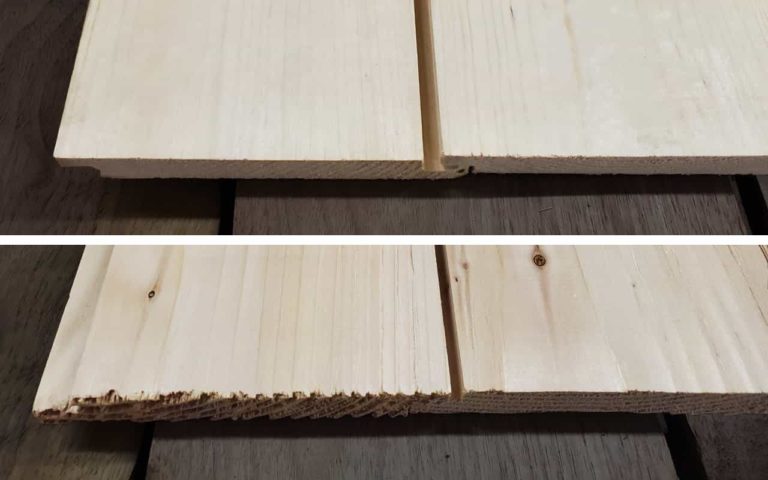
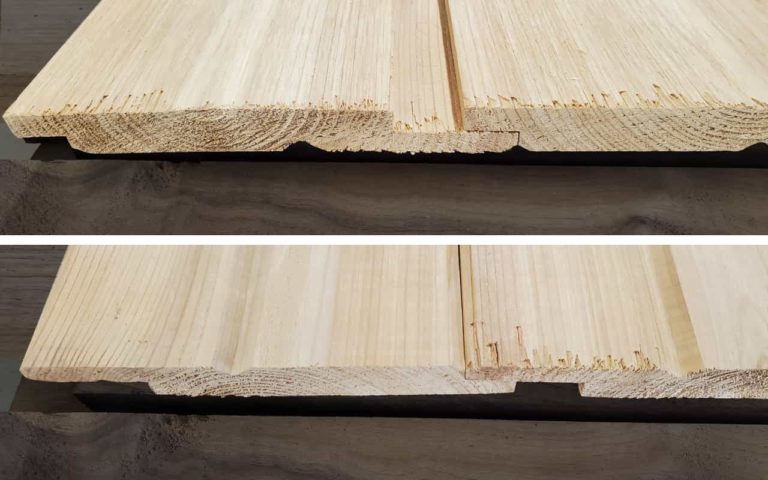
Shiplap patterns are among the most confused patterns used in paneling or siding applications. At its most basic a “shiplap” pattern is one where one edge of a board has been milled to overlap the edge of the next board while leaving a flat surface. Obviously, these patterns can be milled using any type OR size of wood. Installation on any of these will require attention to fitting the boards together properly to and gap variations uniform throughout your project. We’ve pictured three very common types as below; with this short explanation of each:
No Gap:
These boards are milled to fit snugly together when installed. The differences in colorations and grain pattern will vary between boards and indicate where each board begins and ends. Pictured here in 1×6 knotty cedar.

Nickel Gap:
When fitted together, these planks will create a small (1/8”) gap between them, creating a pleasing shadow reveal. We have pictured there in both #2 grade knotty pine and a knotty cedar.

Channel:
This type of effect is created when the boards are milled to create a channel or a wider gap. While the user can specify whatever channel/gap they desire; we’ve shown it here in a typical “channel rustic” – a common cedar siding. Digressing a bit, we’ve also pictured this channel rustic on its opposite side, which with it’s V groove appearance mimics a T&G pattern. The wood used here is a select tight knot (STK) 7/8” thickness cedar.

Thickness
Thicker siding may be more expensive but it is also more stable against interior drying conditions, especially cupping and splitting. Also pattern relief (depth of pattern detail) is more apparent and perhaps more attractive.
Width
Wood’s natural reaction to changes in moisture is directly proportional to size. Although wider sizes install faster with fewer fasteners and are often preferred for appearance, they are more prone to drying; caused movement such as shrinkage and cupping.
Texture
Planed or smooth surfaces have a more formal appearance and are most commonly used for interior paneling. Rougher, more textured surfaces are often used for a more rustic appearance.
Pattern
Pattern selection is generally governed by cosmetic appearance factors and personal desires.
Wood Moisture And Movement
All of our milled products are dried to a moisture content of 19% or less.
Note: Wood shrinks and swells with environmental changes, therefore some preconditioning of wood siding is necessary for best installation results.
When installed in a heated room without being preconditioned, siding should be expected to shrink.
Knotty grades have higher moisture content than select grades.
Note: a 4% moisture change in a board will cause a width dimension change of .5% to 1%, which may seem minor. But a 1% change across a 60 foot wall is 6 inches–a huge difference.
Shrinkage can be minimized by conditioning the siding prior to installation. A) Stack all siding in the room in which it is to be installed with separation (using separator sticks) between each layer for a week to 10 days prior to installation. Plan your timeline accordingly! B) Separators must be lined up one above the other with weight placed on the top layer of boards to minimize cupping.
Finishing
Normally, one would regard finishing as the last step in installation. However, experience shows that prefinishing wood siding prevents drying-related gaps and creates a cleaner, more attractive installation, especially on exterior applications.
Siding to be finished should be primed or prefinished prior to installation.
Prefinishing can minimize unsightly lines where joints separate due to shrinkage exposing the cut (unfinished ends).
For maximum protection always fully prefinish each board, especially when used in kitchens, bathrooms, basements or other high moisture areas. For a successful installation, prefinish or prime the front back and edges of each panel.
Fastening
Fastening, or nailing, must secure the siding to the structure while not restraining and further drying-related size changes. A balance can be achieved by following these rules:
DO NOT secure adjacent panels to each other.
DO NOT place fasteners so far apart in wide areas as to cause splitting action.
DO use an adequate number of fasteners.
DO nail into framing whenever possible. Nail sizes recommended here apply only to nailing directly to framing lumber.
Fastener Type
Fasteners are an important aspect of appearance. Always use fasteners with a length, thickness and head size in proportion with the application. Local usage experience and practice is often the best guide to success; the recommendations made here are intended as guidelines.
For appearance the most commonly used fastener is small-headed or finishing nail driven with a hammer. For siding in high humidity areas like bathrooms, non-corrosive nails should be used. We urge you to use some variety of spiral or ring shank nail on exterior applications.
Remember that virtually any fasteners will eventually stain the wood over time except for stainless steel.
Penetration
Nails should be sized to penetrate solid wood about 1 1/2 times the thickness of the siding.
Spacing
While it is often desirable to “blind” nail siding, there are instances where wide widths require face nailing.
Use at least one nail per framing crossing (i.e. every 16 or 24” on centers) for 4” and 6” nominal widths.
Apply double nails so they are spaced about equally from each other and from nails on adjacent boards.
Nails should be applied into framing at all ends and at intervals never exceeding 4’ along the board length.
Nailing at 16” or 24” intervals is typical and may be required, depending on lumber width.
Insufficient nailing permits excessive wood movement leading to unsightly distortion such as cupping and splitting.
| File (click to download) | Size |
|---|---|
| Standard Patterns Lumber Abbreviations | 182 KB |
| Selected Wood Siding Patterns | 57 KB |
| Wood Siding & Paneling Installation Tips | 147 KB |
| Coverage Estimator | 45 KB |

